Documentation
Cupboard
Four lanes of video, played from a keyboard
Overview
Cupboard is an instrument that samples video the way a sampler samples sound. A clip is loaded into one of four lanes, given a root note and a key range, and played: the key decides the rate, and the picture follows the sound rather than the other way round.
What comes out of the audio outputs is the clip’s own audio at that rate. What the canvas shows is every sounding lane composited, each with its own position, scale, opacity and chroma keyer.
Quick start
System requirements
- macOS 10.15 or later on Intel, 11.0 or later on Apple Silicon. Standalone, AU and VST3
- Windows version in preparation
Installation
| Format | Where it goes on macOS |
|---|---|
| AU | Cupboard.component in ~/Library/Audio/Plug-Ins/Components |
| VST3 | Cupboard.vst3 in ~/Library/Audio/Plug-Ins/VST3 |
| Standalone | Cupboard.app in /Applications |
After installing, restart your DAW or rescan its plug-ins.
Getting a sound out of the standalone app
- Open the app.
- Choose an audio output and a MIDI input device in Preferences (⌘,) on the menu bar. MIDI input starts at none, so nothing plays from a MIDI keyboard until one is chosen.
A first sound
- Drag a video file (.mp4 / .mov / .m4v) onto one of the lanes down the left. Clicking an empty lane to choose a file does the same.
- That lane’s key zone, on the keyboard along the bottom, shows which notes it answers to.
- Play. With no MIDI keyboard, click the keys in the zone editor, or use the computer keyboard: A to L, with Z and X for the octave.
- Root is the note at which the clip plays at its recorded speed (C3, note 60, to begin with). Higher notes play it faster, lower notes slower.
Load all four lanes with different clips, then press Split to divide the keyboard between them, or Layer to stack all four under every note.
The panel
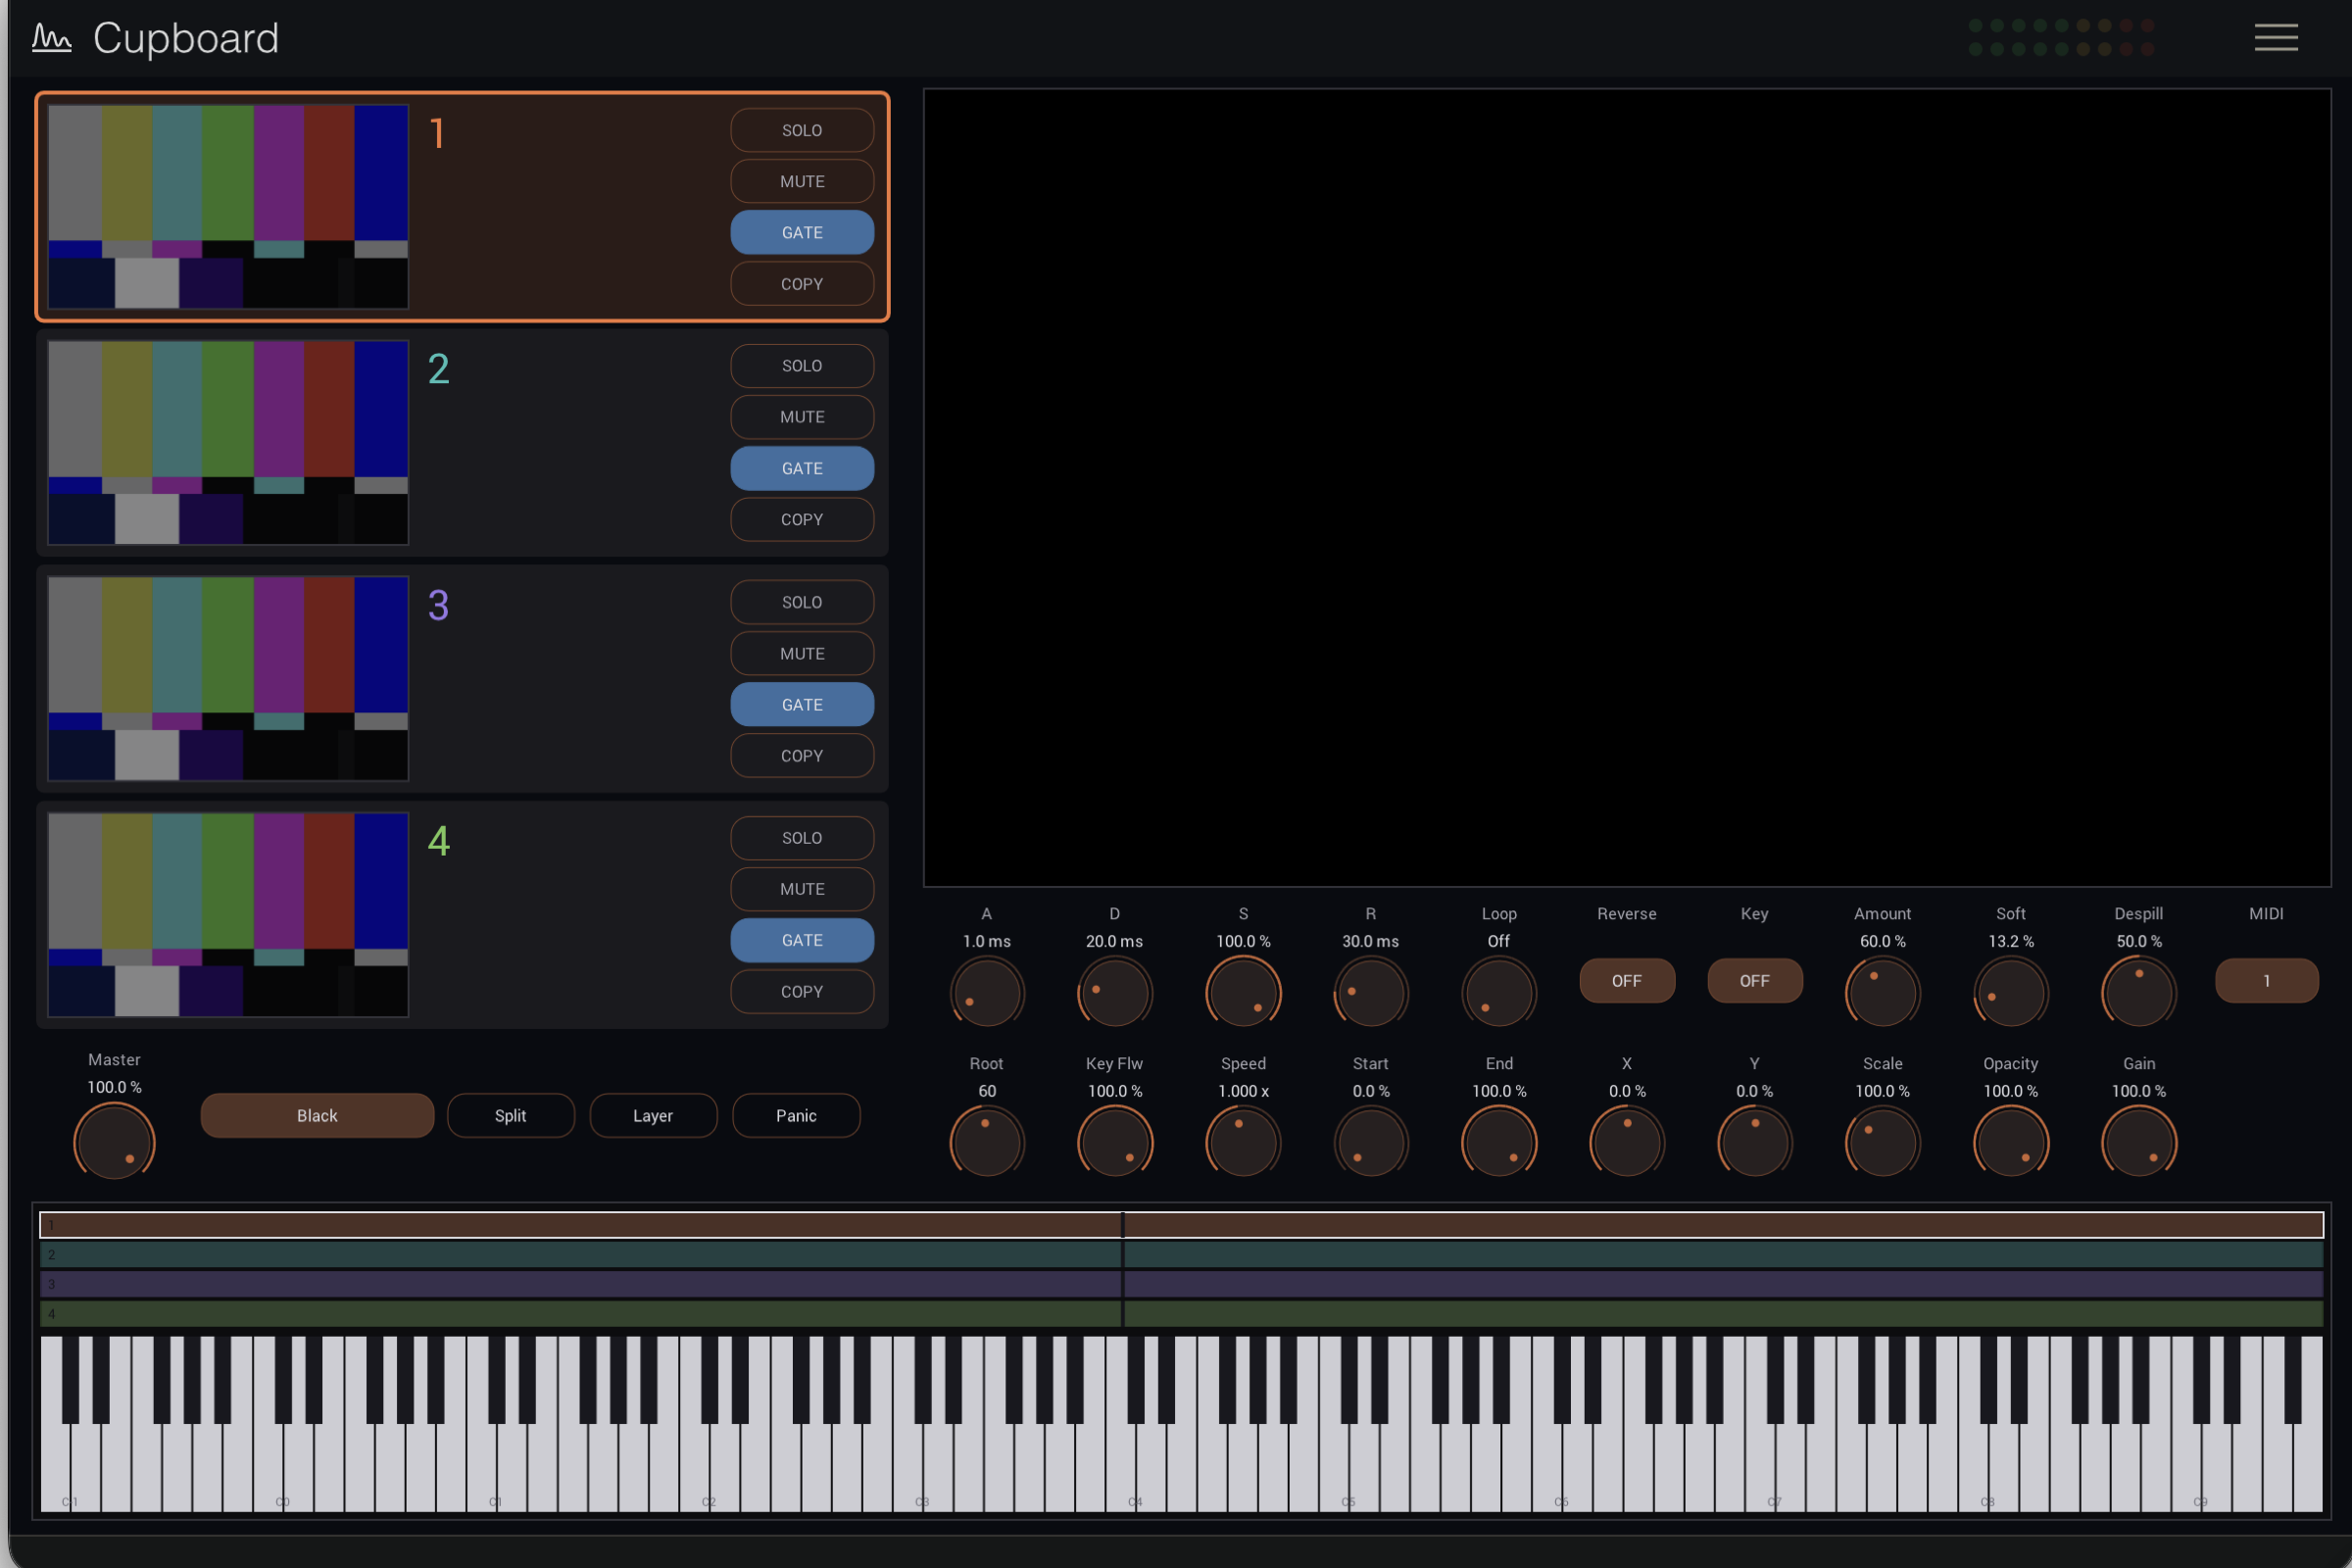
The layout is fixed at 1200 × 800. Drag a corner of the window, or pick a window scale in the ≡ menu, and the whole panel scales together; nothing moves.
The four lanes
Click a lane to select it, and the two rows of controls under the canvas point at it. Those two rows are always “the current lane”: select another and the same knobs show another lane’s values.
Each lane answers to a MIDI channel of its own — to begin with, the lane’s own number. Change it with MIDI at the right end of the second row; Omni makes it answer to every channel.
Four buttons sit at the right of each lane:
- SOLO — silences every other lane
- MUTE — silences this one
- 1 SHOT / GATE / TOGGLE — what letting go of a key does; press to step through them. 1 SHOT plays the clip through, GATE stops on release, TOGGLE stops on the next press. GATE to begin with
- COPY — copies this lane’s settings to another, with or without its clip
Point at the thumbnail and an x appears; click it to unload the clip.
The canvas
Every sounding lane composites here at its own position, scale and opacity, in lane order. Drop a video here to load it into the selected lane.
Canvas sets what the canvas is filled with first. Transparent is what a sender usually wants. Blue, Green and Magenta are for keying again further downstream.
Clip and placement
The first half is how the clip sounds, the second where it sits on the canvas.
At 100%, Key Flw doubles the speed for every octave; at 0% every note plays at the same speed. There is no way to hold the picture still and move the pitch: picture and sound always move together.
Speed multiplies whatever speed the keyboard asked for (0.25x–4x). Start and End are how much of the clip is used, and Loop is what happens on reaching that end point (Off / Forward / Ping-Pong). Reverse runs picture and sound backwards.
Gain and Pan are this lane’s level and position, side by side at the right end of the knob row. The level of all four together is Master, at the lower left.
Envelope, loop and keyer
A / D / S / R shape both the sound and the picture: opacity follows the envelope, so a long attack fades the picture in as well.
Key and the three to its right are the chroma keyer, for material shot against green or blue that has to composite over the lanes below it. It works in chroma rather than RGB distance, so a screen that is unevenly lit still keys.
Working left to right is quickest. Turn Key on, raise Amount until just before the subject starts to go, blend the outline with Soft, then take the green off hair and shoulders with Despill.
Whole-instrument controls
Split and Layer redraw every key zone at once. Split divides the keyboard between the loaded lanes and sets those lanes to Omni; Layer gives every lane the whole keyboard and sets every lane to Omni as well. Either can be adjusted by hand afterwards.
Panic stops every sounding voice at once.
The header and the menu
The band across the top of the window and the ≡ menu are the same in every Hügelton plug-in. This product has no presets, so the band carries no preset field and no ▲ / ▼ pair, and the menu has no preset entries.
| Where | What it does |
|---|---|
| The logo, at the left | Click it for the product information |
| Level meter | The output level. The upper bar is left, the lower right. Red at the top means the output limiter is working |
| ≡, at the right | Opens the menu |
The ≡ menu
- About
… — version and copyright - Settings — settings that belong to this product (see its own chapter)
- Window scale — 75% / 100% / 125% / 150%
- Language — Auto / English / 日本語 (only where a font that can draw Japanese is installed)
Help and tooltips
Point at a control and its name and current value appear beside it, while the band along the bottom of the window says what that control does. The name-and-value bubble can be turned off under ≡ → Settings → Tooltips.
Settings (≡ → Settings)
- Tooltips — show or hide the name-and-value bubble beside the pointer
Key zones
Which notes each lane answers to, shown as a keyboard and edited on it. Drag an edge to move it, drag the middle to slide the whole zone, click a key to hear it. Sounding notes light up here.
Clicking a key here plays the selected lane. The computer keyboard plays it too: A to L, with Z and X for the octave.
Why there are no presets
Cupboard has no presets. That is the product, not the schedule.
A patch cannot carry the four clips — a path belongs to one machine. And most of what is left is about a particular clip: its root note, its key range, where in the file a note starts. On different material those numbers are not a starting point, they are wrong.
What people actually want back is the session, and that comes back in full, clips included. In a DAW the project carries it. The standalone keeps its own, so quitting and reopening puts the cupboard back the way it was.
~/Library/Application Support/Hugelton/Cupboard/standalone.state
Delete that file to start empty.
What does generalise across material is Split, Layer and the canvas fill — and each of those is one button.
MIDI
Each lane listens on a MIDI channel of its own, so the same controller number means “this lane’s parameter” on every channel. CC 24 on channel 1 moves the speed of the lane set to channel 1; CC 24 on channel 2 moves lane 2’s. A lane set to omni answers to every channel. One set of controller numbers serves all four lanes.
A value moved from a controller shows on the panel but is not written to the host’s automation.
Per lane — send on that lane’s channel
| CC | Parameter | Notes |
|---|---|---|
| 20 | Root | maps to the whole note range |
| 21 | Key Low | low end of the lane’s zone |
| 22 | Key High | high end of the lane’s zone |
| 23 | Key Flw | 0% fixed speed, 100% doubles per octave |
| 24 | Speed | 0.25x–4x |
| 25 | Start | % into the clip |
| 26 | End | % into the clip |
| 27 | Loop | 0–42 Off, 43–85 Forward, 86–127 Ping-Pong |
| 28 | Reverse | 0–63 off, 64–127 on |
| 29 | Note Off | 0–42 1 SHOT, 43–85 GATE, 86–127 TOGGLE |
| 30 | Attack | 0.1–2000 ms |
| 31 | Decay | 1–2000 ms |
| 102 | Sustain | 0–100% |
| 103 | Release | 2–4000 ms |
| 104 | Gain | 0–100% |
| 105 | Pan | 64 is centre |
| 106 | X | 64 is centre |
| 107 | Y | 64 is centre |
| 108 | Scale | 5–300% |
| 109 | Opacity | 0–100% |
| 110 | Key | 0–63 off, 64–127 on |
| 111 | Key Amount | Amount on the panel. 1–150% |
| 112 | Key Soft | Soft on the panel. 0–100% |
| 113 | Despill | 0–100% |
No controller changes a lane’s MIDI channel. The channel is the route a controller takes to reach the lane, so one that could change it could put the lane out of reach of the controller that changed it.
Whole instrument — any channel
| CC | Parameter |
|---|---|
| 7 | Master |
| 114 | Canvas (Black / Blue / Green / Magenta / White / Transparent) |
Standard messages
- Note on / off — velocity sets the level of the voice it starts
- CC 64 (sustain pedal) — a note off arriving with the pedal down is held back until the pedal comes up. Lanes set to Gate are the ones this is for
- CC 120 / 123 — stop every sounding voice at once
Pitch bend is not implemented. A clip’s rate is set by the key it was played at, so bending it would slide the picture as well as the sound.
Troubleshooting
Nothing sounds when I play In the standalone app, check that a MIDI input device is chosen in Preferences (⌘,); it starts out as none. In a DAW, check the track’s MIDI input. Either way, the keys in the zone editor and the computer keyboard (A to L) will play.
I loaded a clip into a lane and nothing happens Check that the lane’s key zone covers the notes being played. Split divides the keyboard between whichever lanes hold a clip.
I hear it but I cannot see it Check that lane’s Opacity and Scale, and whether X / Y have moved it off the canvas. A file with no picture in it says so on the lane.
Keying the green screen takes the subject too Lower Amount — the higher it is, the more it takes. A jagged outline is Soft; green left around the edges is Despill.
Cupboard does not appear in my DAW Check where it was installed, then restart the DAW or rescan its plug-ins.
Changelog
0.1.0
First release.
Terms of use
This software, and everything that ships with it — presets, images, sounds, typefaces, documentation — is the work of Hügelton Instruments. Copyright belongs to Hügelton Instruments. It is not open source.
Buying it, or taking part in a beta, gives you a personal, non-transferable right to install and use it on your own equipment. That is all it gives you.
The following are strictly prohibited:
- Reverse engineering, decompiling, disassembling or otherwise analysing it
- Redistribution, whether paid or free, in whole or in part
- Resale, lending or transfer
- Taking any bundled asset — images, sounds, presets, typefaces, documentation — and using it outside this software
- Circumventing licensing or protection
The software comes as it is. There is no warranty on how it works or what it produces.